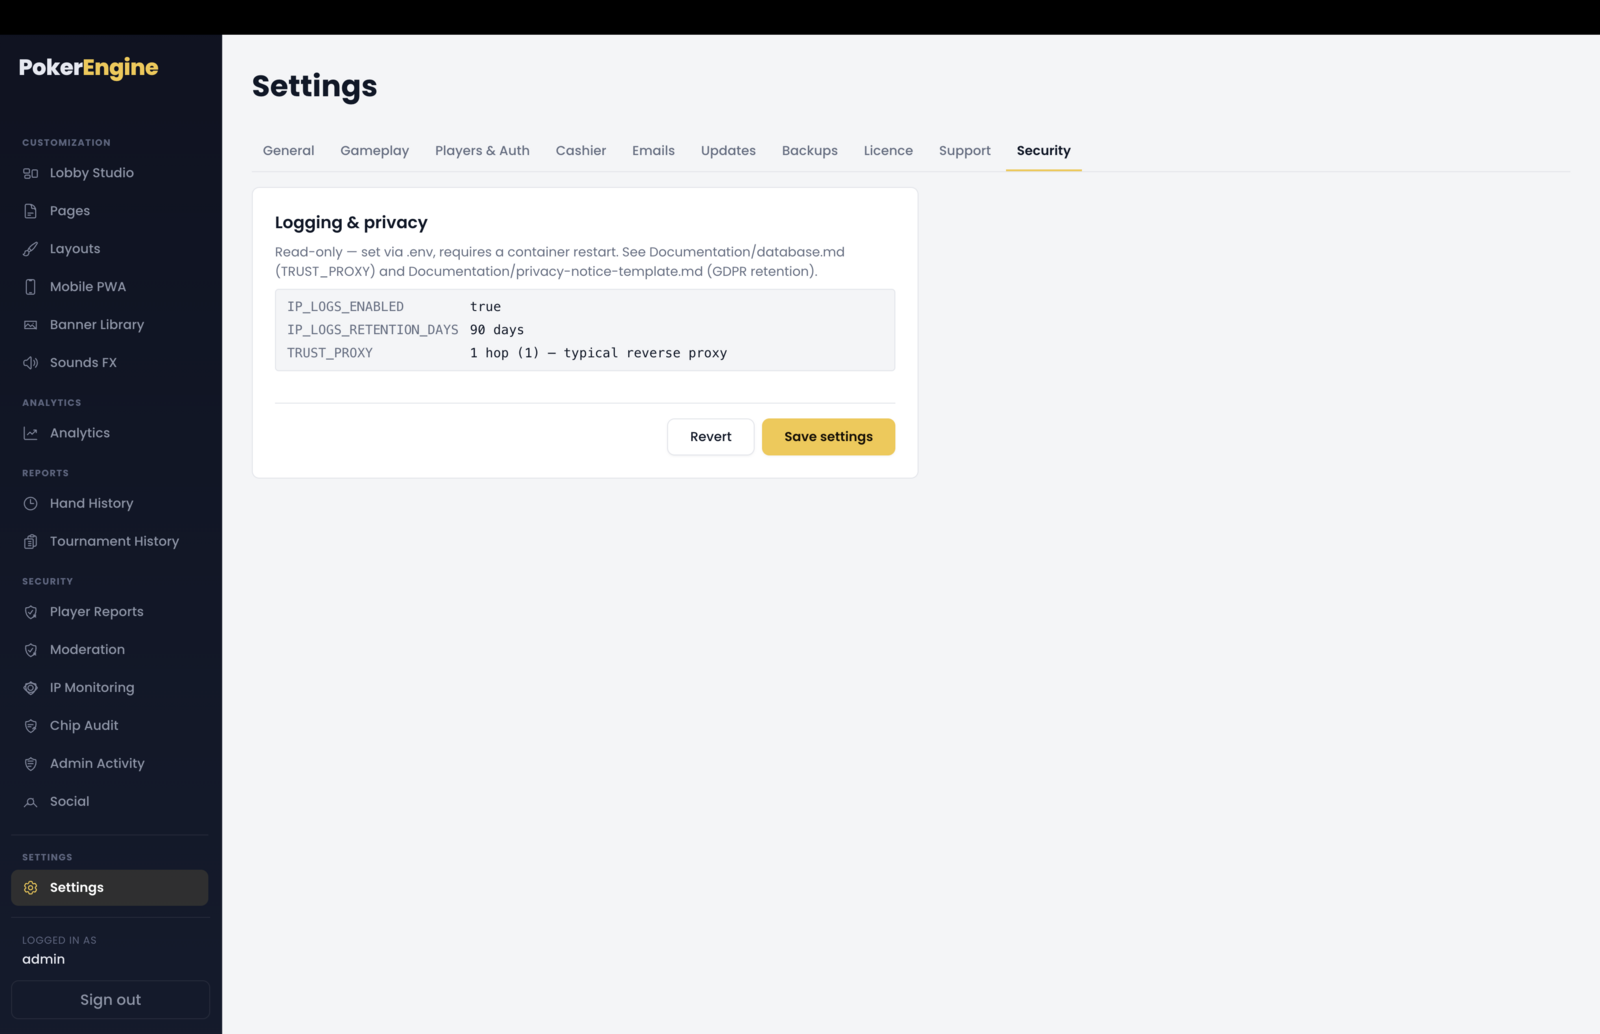
The Settings section is where you configure platform-wide options. It’s organized into tabs
across the top — General, Gameplay, Players & Auth, Emails, Updates, Backups, Licence, Support,
Security — each covering one area. Edit any tab and click Save once to apply everything; a
Revert button undoes unsaved changes.
Most settings apply live (no restart). A few environment-level options (shown on the Security
tab) require a quick server restart, and the page tells you which.
General
The General tab covers your basic site identity and a couple of housekeeping defaults, with a
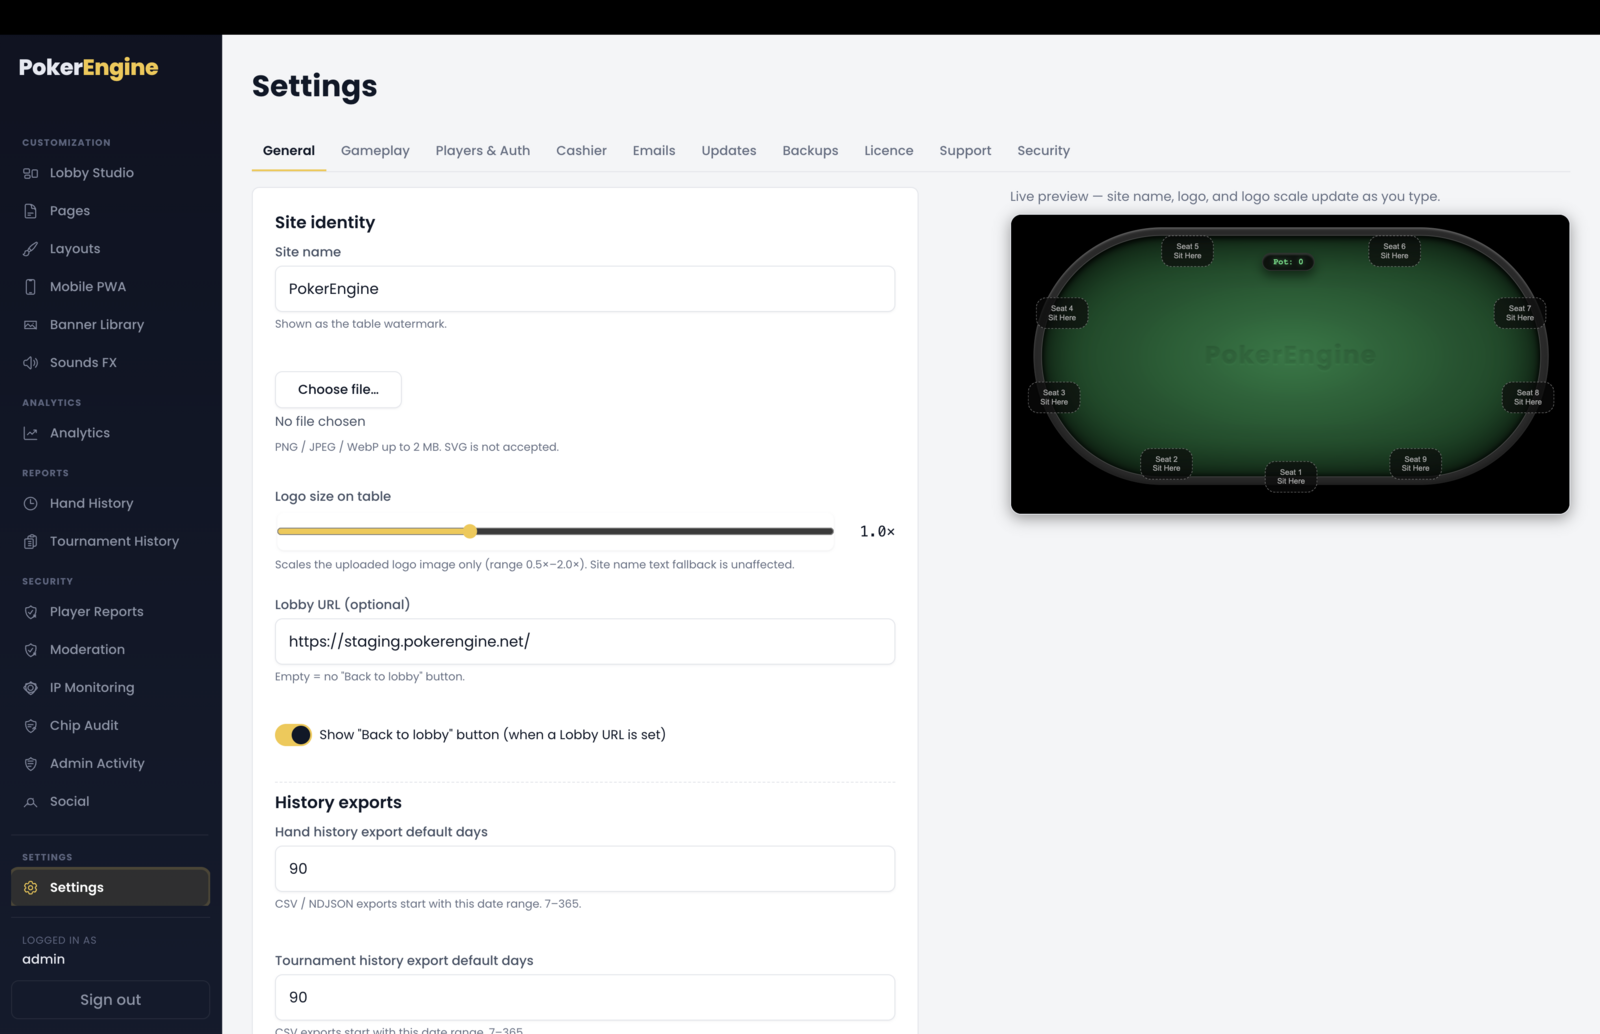
live preview of a poker table on the right so you can see your name and logo update as you type.
To avoid confusion: this tab sets the in-game table branding (the watermark on the
felt) plus a couple of basics. Your overall platform look — theme, colors, login page, menus,
footer — is designed in the separate Layouts section.
General — table branding (site name + logo watermark) and export defaults, with a live table preview.
Site identity
Site name — shown as the watermark on the poker table (behind the felt). Defaults to “PokerEngine”; change it to your brand.
Logo — upload a logo image to use as the table watermark instead of the text (PNG, JPEG or WebP, up to 2 MB — SVG isn’t accepted). Remove it anytime to go back to the text watermark.
Logo size on table — a slider to scale your uploaded logo (0.5×–2×) so it sits nicely on the felt.
Lobby URL(optional) — a link for a “Back to lobby” button, if you want players to be able to jump back to an external lobby or landing page.
Show “Back to lobby” button — turns that button on (it only appears when you’ve set a Lobby URL). Off by default.
History exports
Hand history export default days — the default date range pre-filled when you export hand history (7–365, default 90). This is just a sensible starting range; you can always pick a different range at export time.
Tournament history export default days — the same, for tournament-history exports.
Good to know
Everything here applies live — save and it’s in effect, no restart.
Table branding vs. platform look. The logo and name here brand the poker table; to brand your lobby, pages and menus, use Layouts.
The logo saves as soon as you pick it (it doesn’t wait for the Save button), and only one logo is kept per install — a new upload replaces the old one.
Ready to use. Sensible defaults ship out of the box (a working watermark, no logo required, export ranges pre-set), so you can leave this tab untouched and everything still works.
Gameplay
The Gameplay tab tunes how the game feels — the timers that pace a hand, how tournament lobbies
are laid out, and the achievement notifications players get. Everything here applies live (changes
take effect from the next hand — no restart).
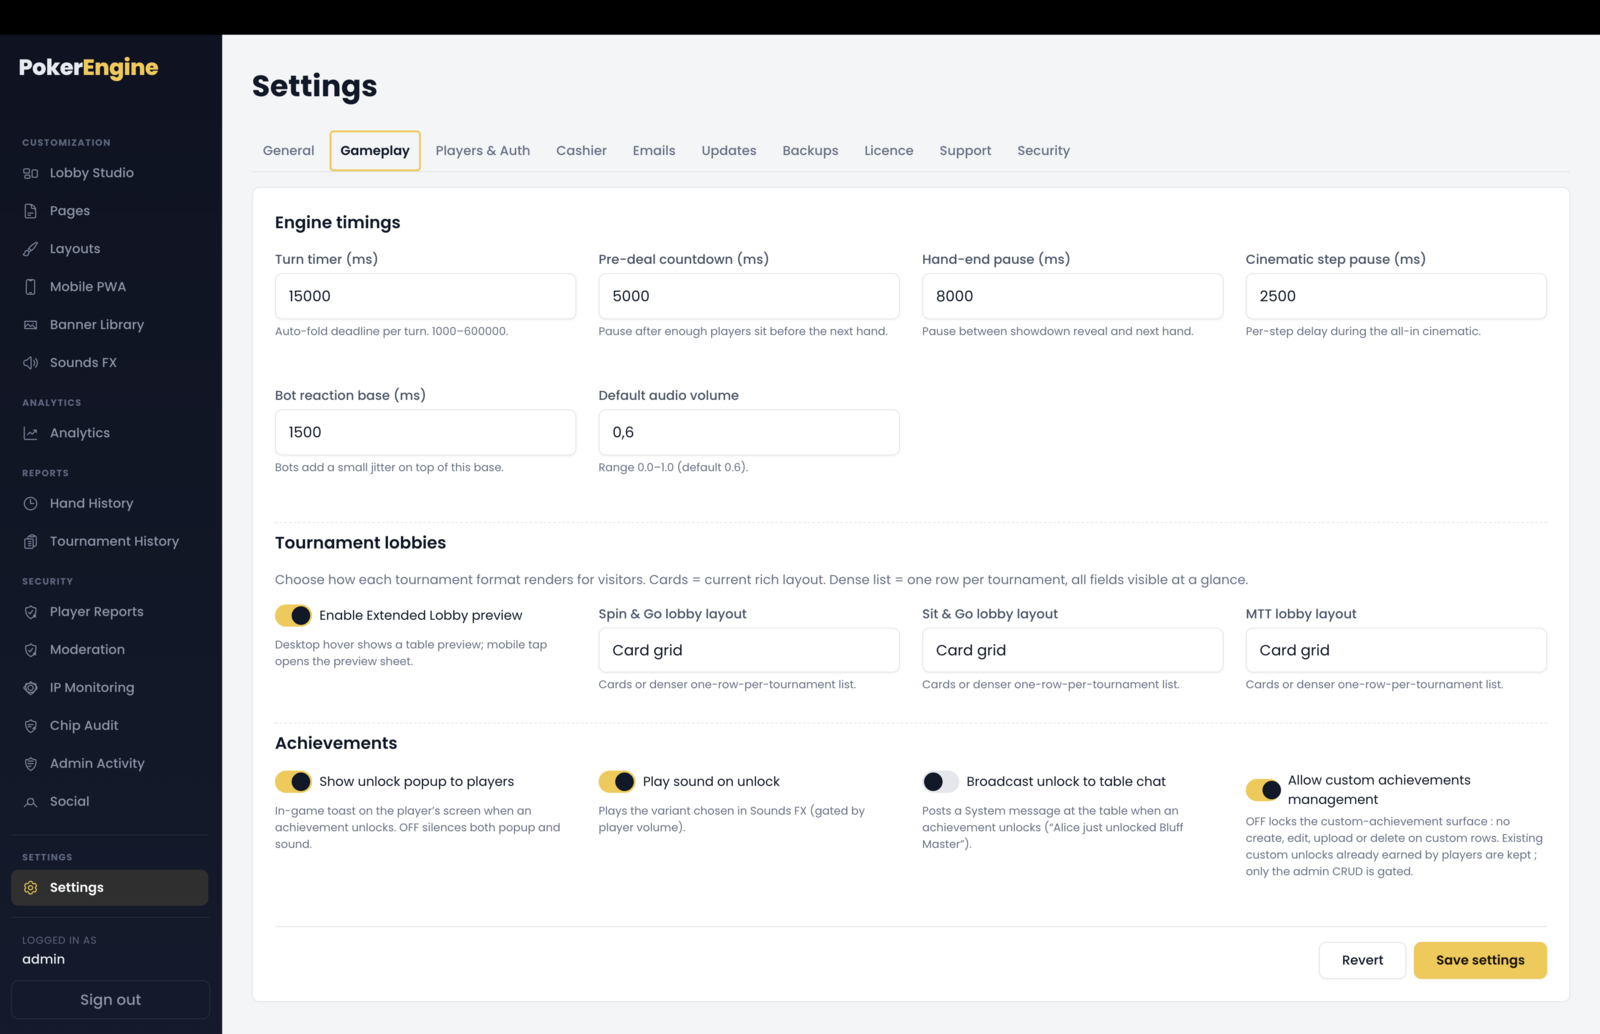
Gameplay — engine timings, per-format tournament lobby layout, and the achievement notification toggles.
Engine timings
These control the rhythm of play. The defaults are well-balanced; adjust them only if you want a faster or slower
feel.
Turn timer — how long a player has to act before they’re auto-folded (default 15 seconds). This is the real clock; the on-screen countdown ring mirrors it.
Pre-deal countdown — a short pause once enough players are seated, before the next hand is dealt (default 5 seconds).
Hand-end pause — the breathing room after a hand is decided, before the next one starts (default ~10 seconds).
All-in animation pause — the pacing of the dramatic all-in reveal (default 2.5 seconds per step).
Bot reaction time — how long bots “think” before acting (default 1.5 seconds, with a little natural variation).
Default audio volume — the starting sound level for new players (default 60%). Each player controls their own volume after that.
Tournament lobby layout
Choose how each tournament format’s lobby looks to players — a card grid or a dense
list — independently for Spin & Go, Sit & Go, and
MTT. All default to grid.
Achievements
These control the player-facing achievement experience (the badges you manage in the Achievements section):
Show unlock popup — a celebratory toast when a player earns an achievement (on by default). Turning this off also silences the unlock sound.
Play sound on unlock — plays the congratulations sound you chose in Sounds FX (on by default, and still subject to each player’s own volume).
Announce unlocks in table chat — posts a “so-and-so just unlocked X” message at the table (off by default).
Allow custom achievements — enables creating and editing your own achievements in the Achievements section (on by default). Turning it off just locks editing; players keep any badges they already earned.
Good to know
Timings apply from the next hand — no restart, and connected players’ clocks re-sync automatically.
The volume setting only affects new players — everyone can still set their own level.
The achievement toggles here are the master switches for the notifications described in the Achievements and Sounds FX sections.
Ready to use. Every field ships with a sensible default, so a fresh install plays perfectly without touching this tab.
Players & Auth
The Players & Auth tab controls how players sign up and log in, and what they start with. It
has three parts: Players, Email & verification, and Google
sign-in.
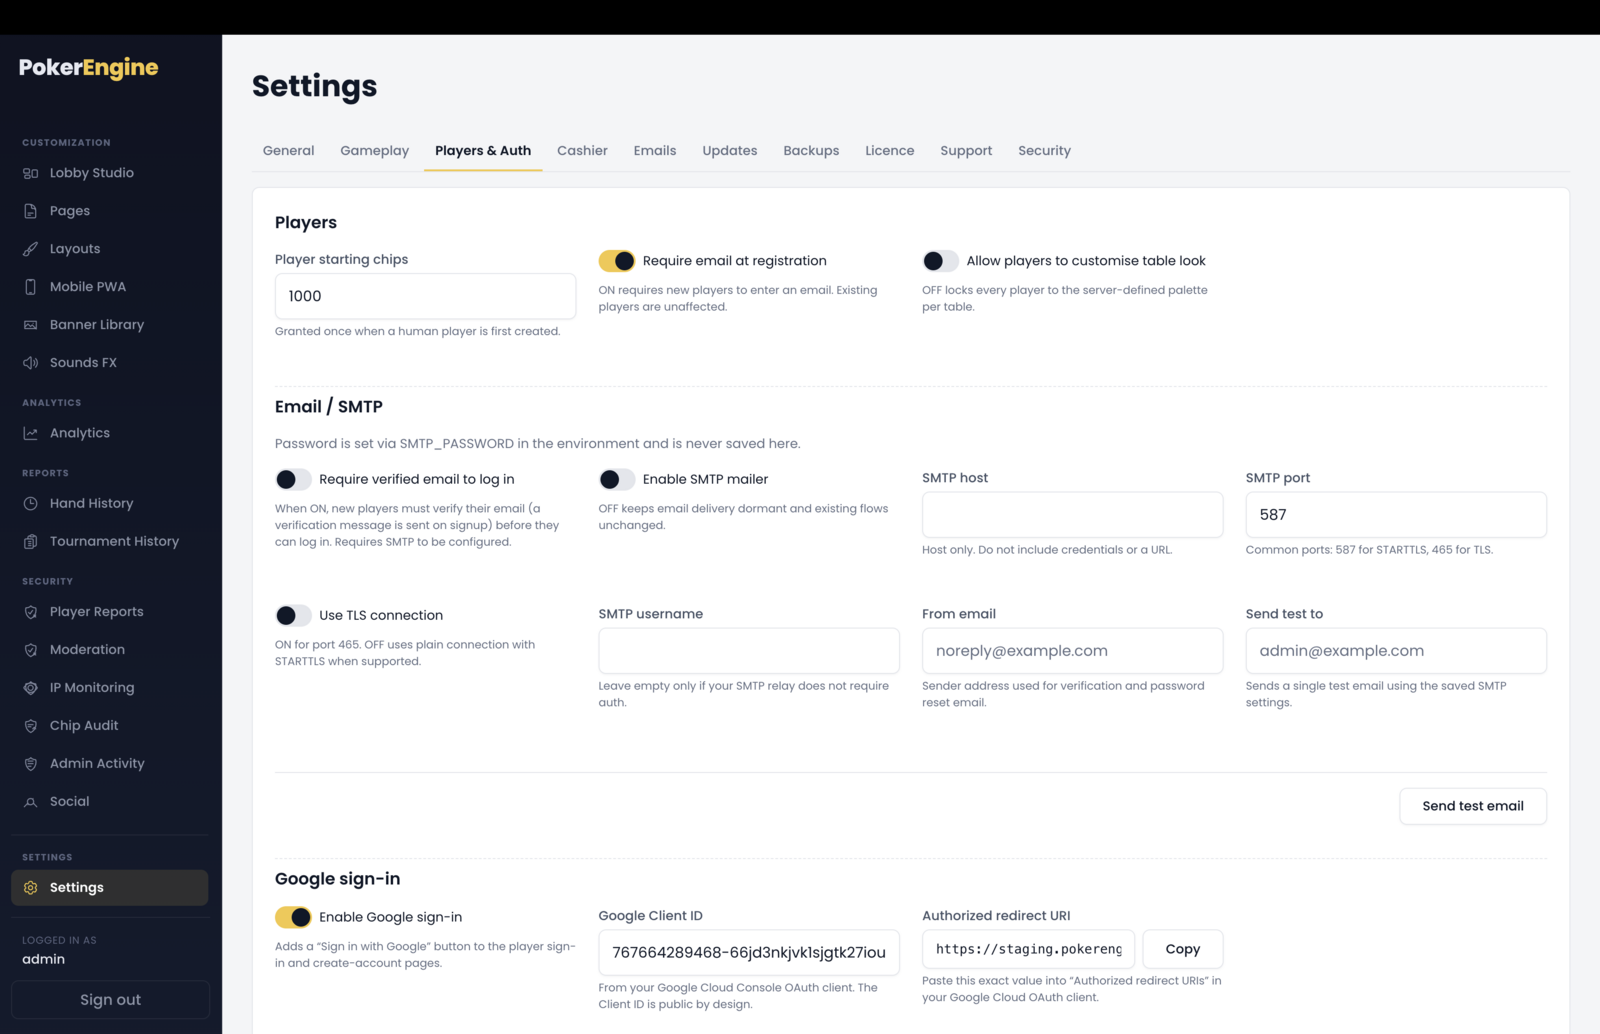
Players & Auth — signup defaults, SMTP email & verification, and Google sign-in (credentials you provide).
Players
Player starting chips — how many chips a new human player receives when they first sign up (default 1,000).
Require email at registration — whether new players must provide an email to sign up (on by default).
Allow players to customise the table look — when on (default), players can pick their own felt / rim / chip colors; when off, everyone sees your server-defined table look. (This is about the table’s appearance only — not display names or avatars.)
Email & verification
Require verified email to log in — when on (default), new players must click a verification link before they can log in. This needs email (SMTP) to be set up — if email isn’t configured, the requirement is quietly skipped.
SMTP settings — connect your email provider so PokerEngine can send verification and password-reset emails: host, port, TLS, username, and the “from” address. For security, the email password is set in your server’s environment (.env), not here. A Send test email button lets you confirm it works.
You customize the actual look and wording of your emails in the separate Emails tab.
Google sign-in
Let players log in with their Google account. You provide your own Google credentials (a quick one-time setup in
the Google Cloud Console — the documentation includes a step-by-step guide):
Enable Google sign-in — adds a “Sign in with Google” button to the login page (off by default).
Google Client ID — paste the Client ID from your Google OAuth credentials here.
Authorized redirect URI — the tab shows the exact URI (with a Copy button) to paste into your Google credentials so Google knows where to send players back.
Client Secret — for security, your Google Client Secret goes in your server’s environment (.env), not in the admin. The tab shows a badge telling you whether the secret is detected on the server, and a copyable .env line. Because it’s an environment value, a quick restart is needed after you add it.
Google sign-in only appears to players once it’s enabled and fully configured (Client ID here +
Client Secret in the environment).
Good to know
Email verification and emails need SMTP. Set up the SMTP section (and add the email password to your environment) before relying on verification or any emails.
Avatars are automatic. New players are given a random avatar from the built-in gallery, and if they have a Gravatar for their email, that’s used instead — nothing to configure here.
Google credentials are yours. As a white-label product, you create your own Google OAuth client, so sign-in runs under your project. Client ID goes in the admin, Client Secret in the environment.
Ready to use. Out of the box, players sign up with an email and 1,000 chips, get an avatar automatically, and can customize their table — no configuration required. Email verification and Google sign-in are optional add-ons you enable when ready.
Emails
The Emails tab lets you customize the automatic emails PokerEngine sends players. It ships with a
set of ready-made, branded templates, so with email set up your platform sends professional emails
without you editing anything — customizing is optional.
Reminder: this tab is about the content and look of your emails. The
connection to your email provider (SMTP) is set on the Players & Auth tab —
emails won’t actually send until that’s configured.
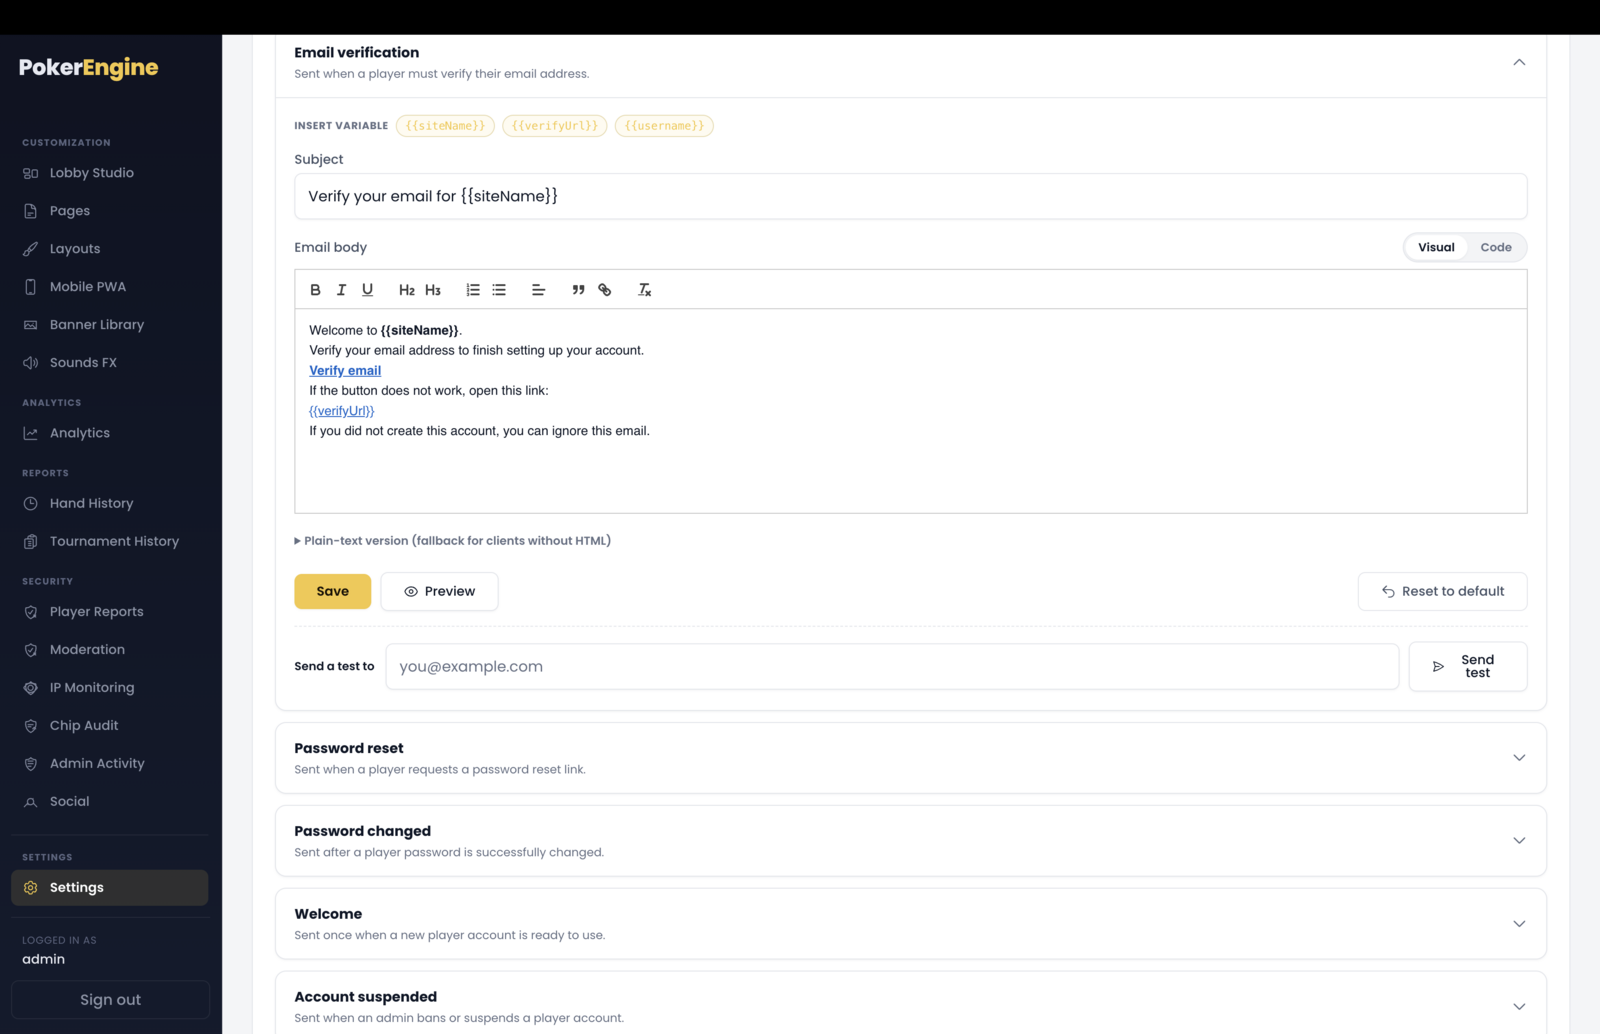
Emails — six branded transactional templates with a visual/code editor, variable chips, preview and test.
The six emails
Email verification — asks a new player to confirm their email address.
Password reset — sends a reset link when a player forgets their password.
Password changed — confirms a password was changed.
Welcome — greets a new player once their account is ready.
Account suspended — notifies a player when you suspend or ban them (includes your reason).
Account reinstated — lets a player know their account has been restored.
You can’t add or remove templates — these are the six the platform sends.
Editing an email
Each email is a card you expand to edit:
Subject — the email’s subject line.
Body — edit visually (a simple formatting toolbar) or switch to Code for raw HTML.
Plain-text version — an optional fallback for email apps that don’t show HTML.
Variables — click a chip to insert a placeholder that’s filled in automatically when the email is sent — like the player’s name, your site name, and the relevant link. Each email has its own set of allowed variables.
Three buttons help you work safely: Preview (see the finished, branded email with sample data — no
email is sent), Send test (send it to an address you type, to check it for real — requires SMTP), and
Reset to default (discard your changes and restore the built-in version).
Email branding
One global control here — the accent color used for the header stripe and buttons in every email.
Your logo and site name in emails come from the General tab (Site identity), so set
those once and every email matches your brand.
Good to know
Emails only send once SMTP is set up (on the Players & Auth tab). Until then, Preview still works, but Send test will remind you to configure it.
Logo and name aren’t here — they’re inherited from the General tab; this tab controls wording, layout and the accent color.
Use the variable chips rather than typing placeholders by hand; only each email’s own variables are allowed.
Ready to use. All six emails have polished defaults, so once your email provider is connected, everything just works — and you can always reset a template back to default.
Updates
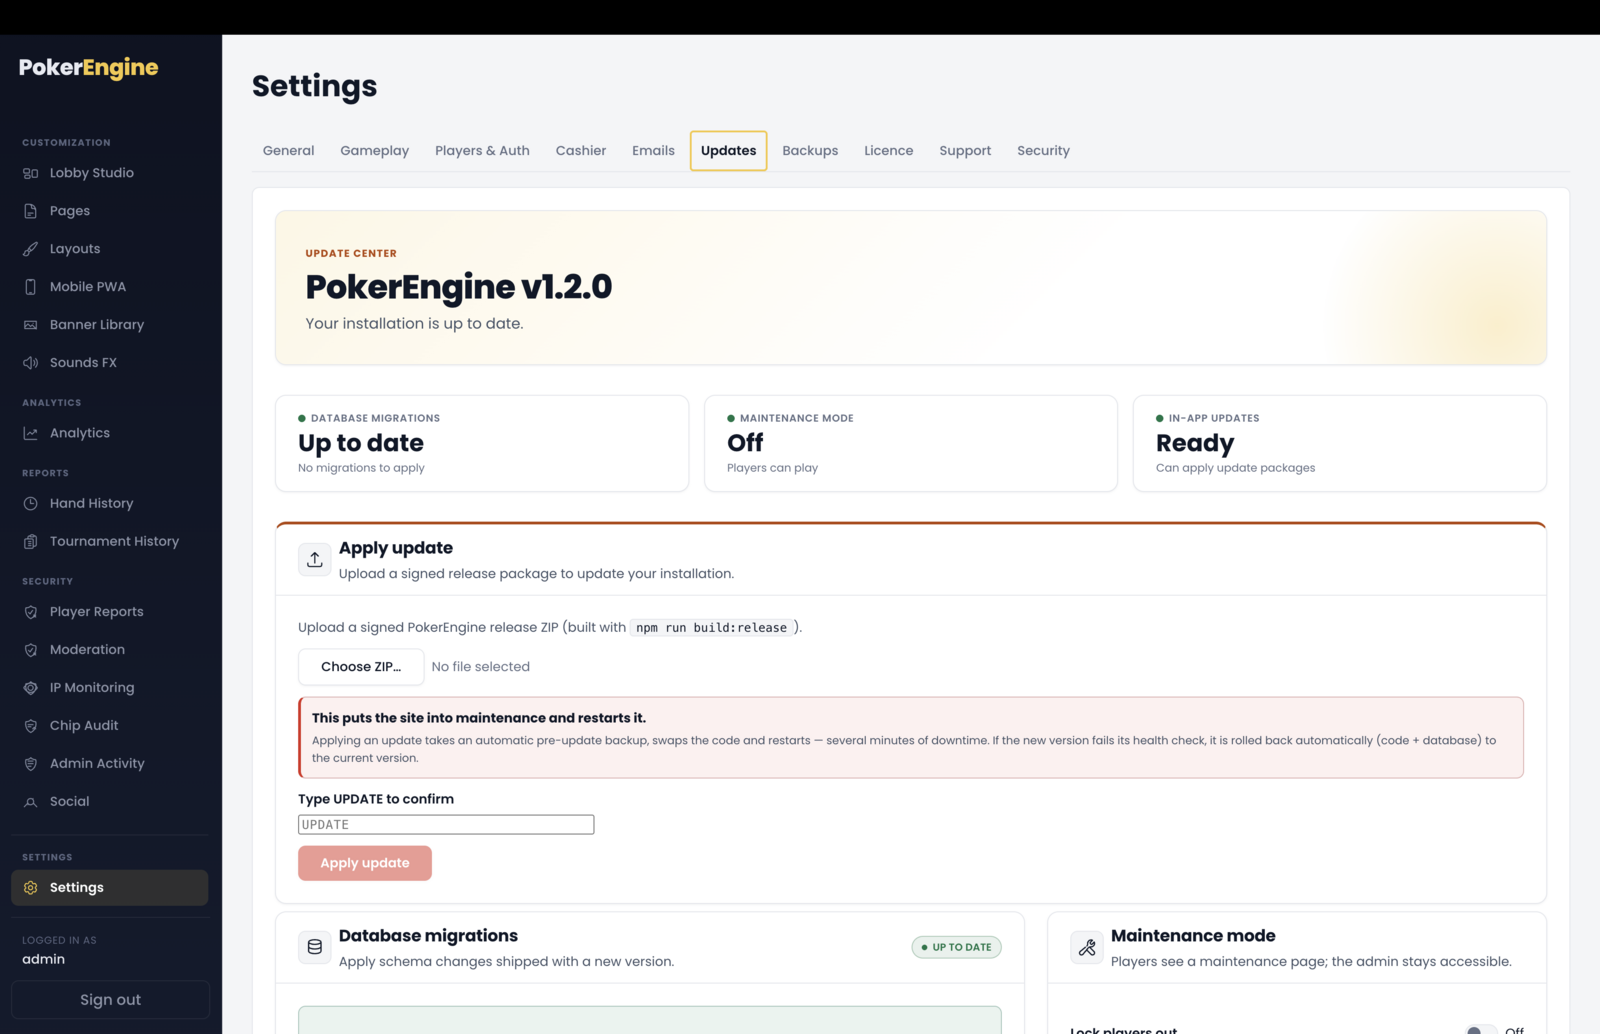
The Updates tab (the “Update center”) lets you update PokerEngine right from the admin — no
developer needed. When a new version is released, you upload the update package and the platform handles the
rest: it backs itself up, installs the new version, restarts, and checks everything came back healthy — automatically
rolling back if anything goes wrong.
Updates — the update center: current version and status, plus one-click Apply with automatic backup and rollback.
What it shows
Your current version (e.g. “PokerEngine v1.2.1”).
Pending database migrations — whether any database updates are waiting.
Maintenance mode — whether players are currently locked out.
In-app updates: Ready / Not ready — whether your server setup supports one-click updates (it needs a code volume and an auto-restart policy; the standard Docker setup qualifies).
Applying an update
Get the official update package (a .zip) for the new version, choose the file in Apply
update, type UPDATE to confirm, and click Apply update. From here it’s
automatic — a full-screen progress overlay keeps you posted and finishes with a Reload admin button.
Behind the scenes, in order: the platform takes a fresh backup, puts the site into maintenance,
installs the new version, restarts, and verifies it’s healthy. If the
new version doesn’t come up cleanly, it automatically rolls back to the previous version and database.
Built-in safety
Only official, signed packages are accepted. Update files are cryptographically signed; anything tampered with or not a genuine release is rejected before anything is touched.
A backup is taken automatically before every update — nothing is applied against an un-backed-up database.
Automatic rollback if the update fails its health check or won’t start.
Brief downtime. The site goes into maintenance and restarts during the update, so plan updates for a quiet moment — the overlay tracks progress.
The other controls here
Run pending migrations — applies any waiting database updates. Run this after a version update if migrations are pending.
Maintenance mode — manually lock players out (e.g. before doing server work) and turn it back off.
Create backup / Manage backups — a shortcut to take a backup or jump to the Backups tab.
Good to know
Updates only go forward — you install newer versions, not older ones.
Some updates need a manual step. If a release adds new software dependencies, the one-click updater will tell you it must be applied manually (following the included guide) — this is rare and clearly signposted.
Ready to use. No configuration needed; on a standard deployment the updater is ready, and every update is backed up and reversible by design.
Backups
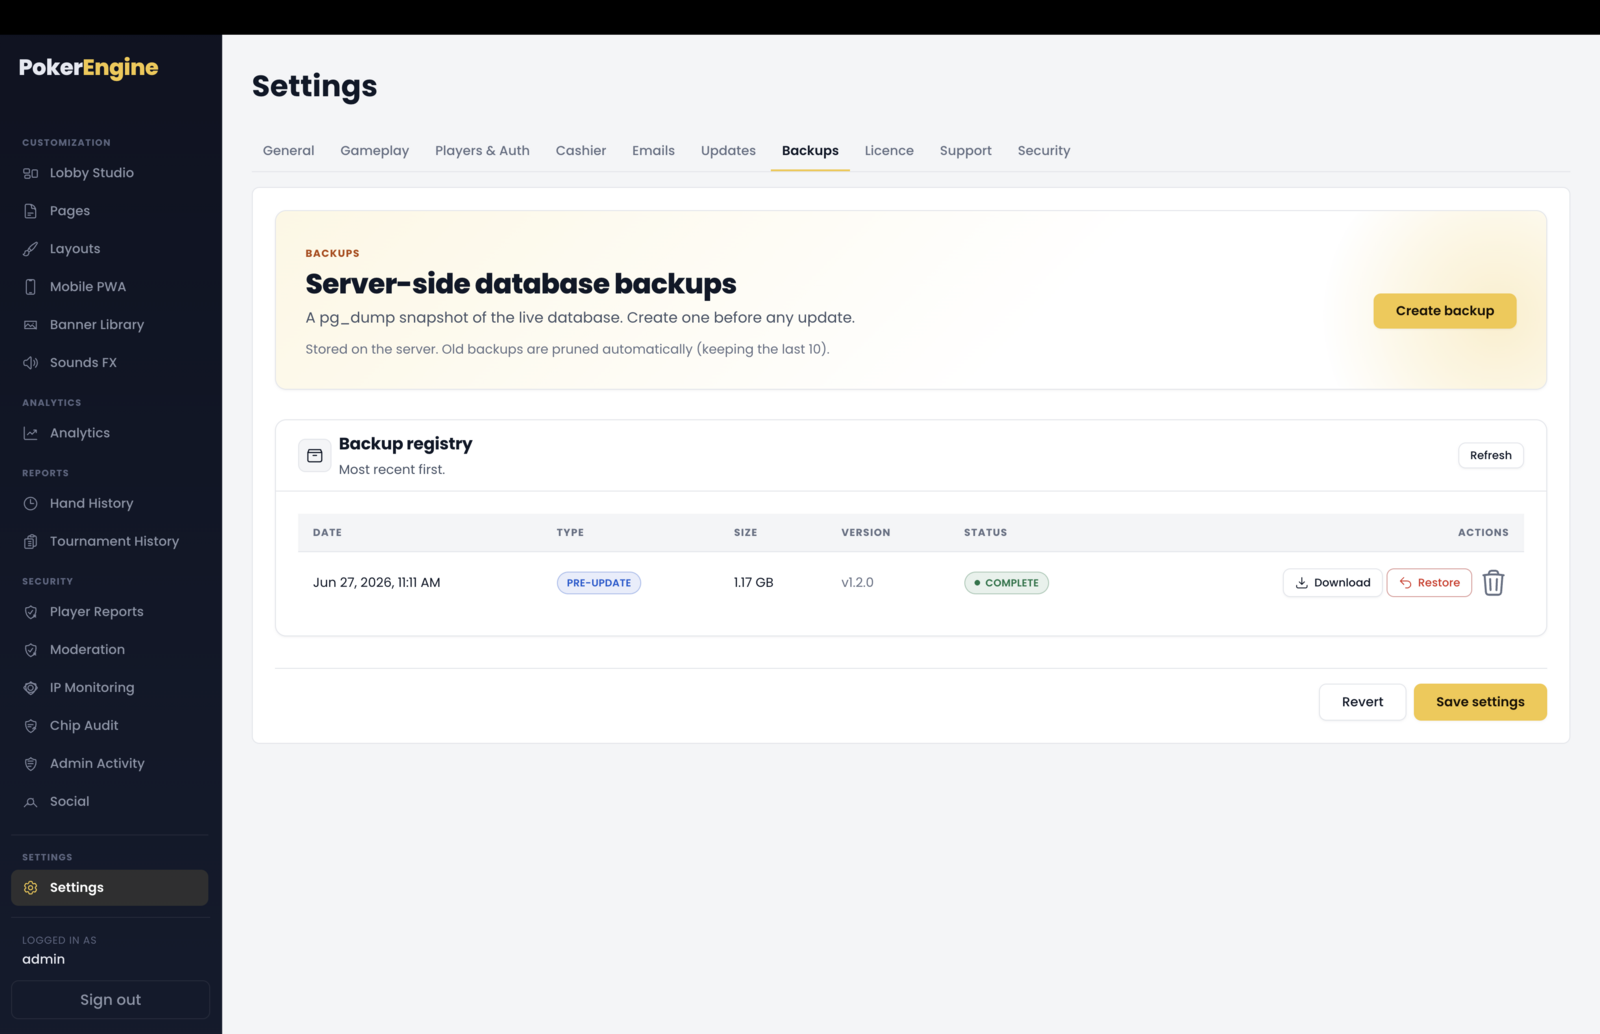
The Backups tab manages database backups — snapshots of your platform’s data
(players, hands, tournaments, settings, and so on). You can create one anytime, download it to keep a copy elsewhere,
and restore from one if you ever need to roll back.
What’s included: this backs up the database. Your application code is versioned separately
by the Updates system, and it doesn’t include uploaded image/sound files — so keep your own copies of any custom
assets.
Backups — server-side database snapshots with type, size, version and status, plus download, restore and delete.
The backup list
Each backup shows its date, type, size, the version
it was made on, and its status (Creating…, Complete, or Failed). Types you’ll see:
Manual — one you created.
Pre-update — taken automatically before an update.
Pre-restore — a safety snapshot taken automatically just before a restore.
Creating a backup
Click Create backup. It runs in the background and appears in the list when it’s done (only one
backup runs at a time). It’s a good habit to create one before any big change — and updates already do this for you.
Restoring from a backup
Restoring replaces your current database with the backup, so it’s a careful, guarded action: click
Restore on a completed backup, read the warning, and type RESTORE to confirm. Then
it’s automatic and safe — the system first takes an automatic safety backup of your current data (so a
restore can itself be undone), enters maintenance mode, restores the database, and restarts. The
restore runs all-or-nothing — if anything goes wrong, it rolls back and your data is left intact. When
it’s back online, the site stays in maintenance so you can check everything looks right; turn maintenance off (in the
Updates tab) when you’re happy.
Download, delete, and retention
Download — save a backup to your own computer or storage. Backups live on your server, so downloading is how you keep a safe copy off-site.
Delete — permanently remove a backup from the server.
Automatic cleanup — the platform keeps your most recent backups (the last 10 by default) and prunes older manual ones. The automatic pre-update and pre-restore safety backups are kept until you delete them yourself.
Good to know
Database only. These are database snapshots, not a full copy of code and uploaded files.
Restore is reversible. Because a safety backup is taken first and the restore is all-or-nothing, you’re protected against a bad restore.
Watch your disk space. Backups add up on the server over time; download important ones and delete what you don’t need.
Ready to use. Works out of the box — create backups on demand, and updates create them for you automatically.
Licence
The Licence tab is where you activate your copy of PokerEngine with your Envato/CodeCanyon
purchase code — the standard way to register a marketplace product you’ve bought.
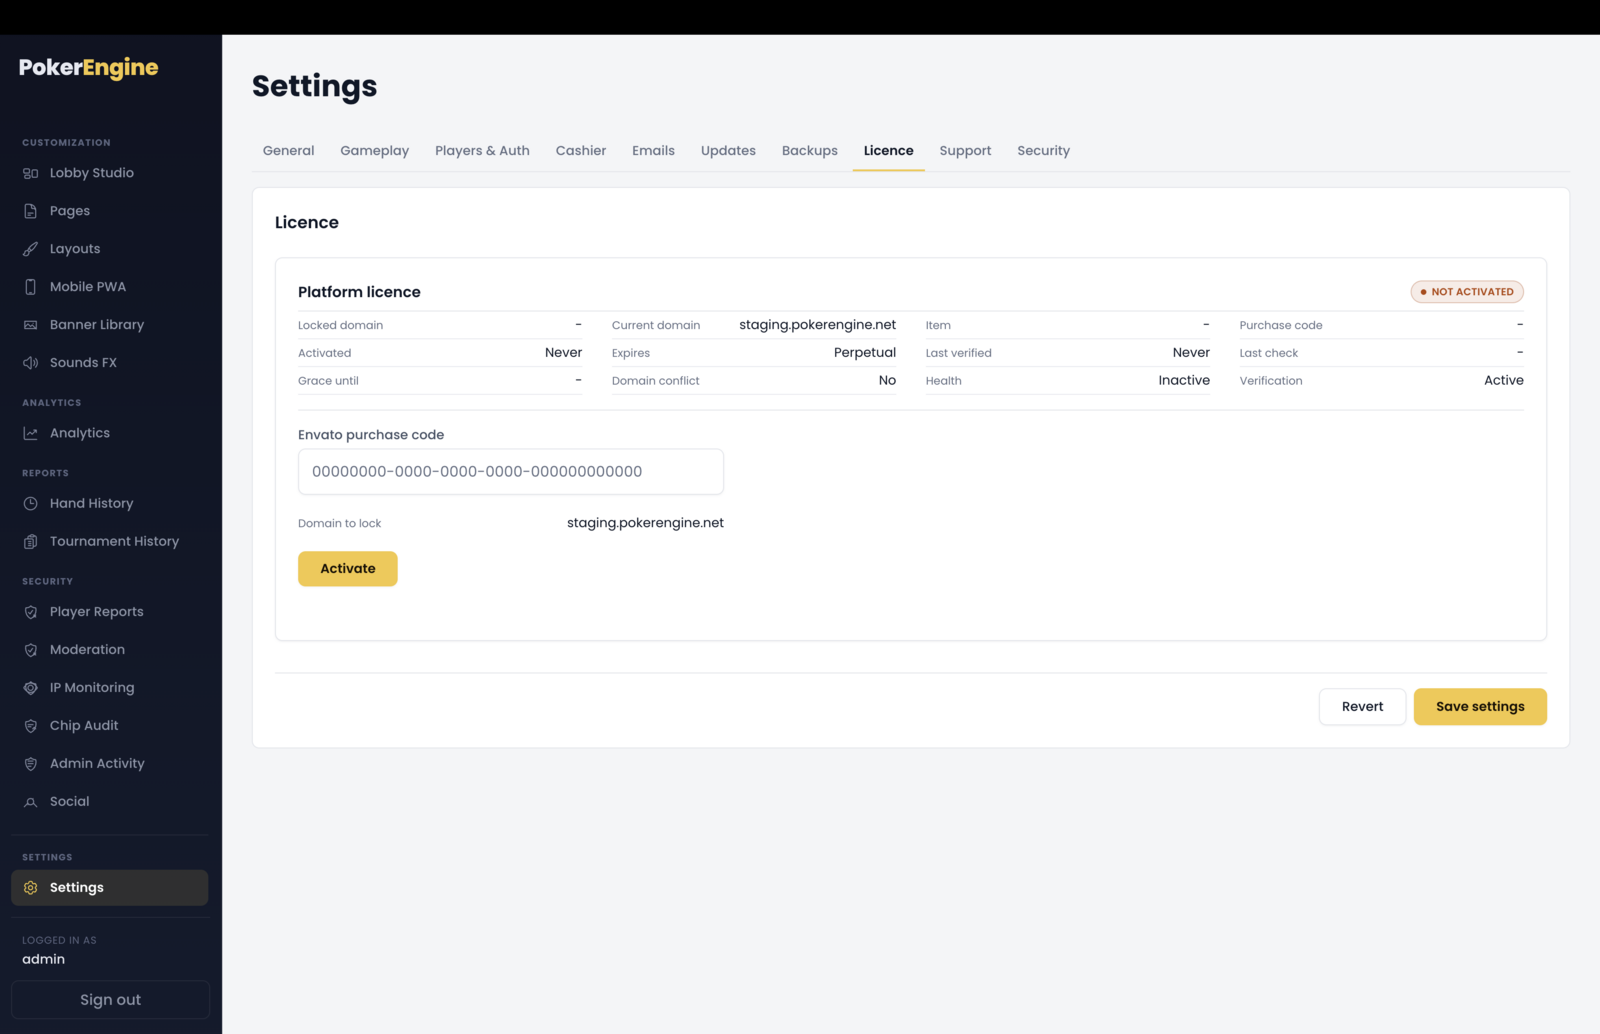
Licence — activate with your Envato purchase code; the licence locks to your domain and is perpetual.
Finding your purchase code
Your purchase code is on your CodeCanyon Downloads page: next to your PokerEngine purchase, choose
“License certificate & purchase code” — the code is a long string that looks like
00000000-0000-0000-0000-000000000000.
Activating
Paste your purchase code into the Envato purchase code field, check the domain to
lock shown (the address you’re running on now), and click Activate. Your licence is verified
and locked to that domain, and the status badge turns to Active.
What the status shows
Active / Not activated badge.
Locked domain vs current domain — so you can see if you’re running on the domain the licence was activated for.
Activated date and Expires — PokerEngine licences are perpetual (no expiry), so this shows “Perpetual”.
Health — a quick indicator that everything’s in order.
Re-verify and deactivate
Re-verify now — re-check your licence on demand (it’s also re-checked periodically in the background).
Deactivate — clear the local activation record (for example, if you’re moving to a different domain), then activate again on the new one.
Good to know
One licence per domain/deployment. Each site you run needs its own Envato licence, following Envato’s standard Regular vs Extended licence terms. If you serve an activated copy from a different domain, the tab flags a domain mismatch.
Offline-tolerant. A brief network hiccup during a background re-check won’t cause any problem — there’s a grace period, and any warning is just an admin reminder.
Ready to use. Activation is a quick one-time step; paste your code, lock your domain, and you’re set.
Support
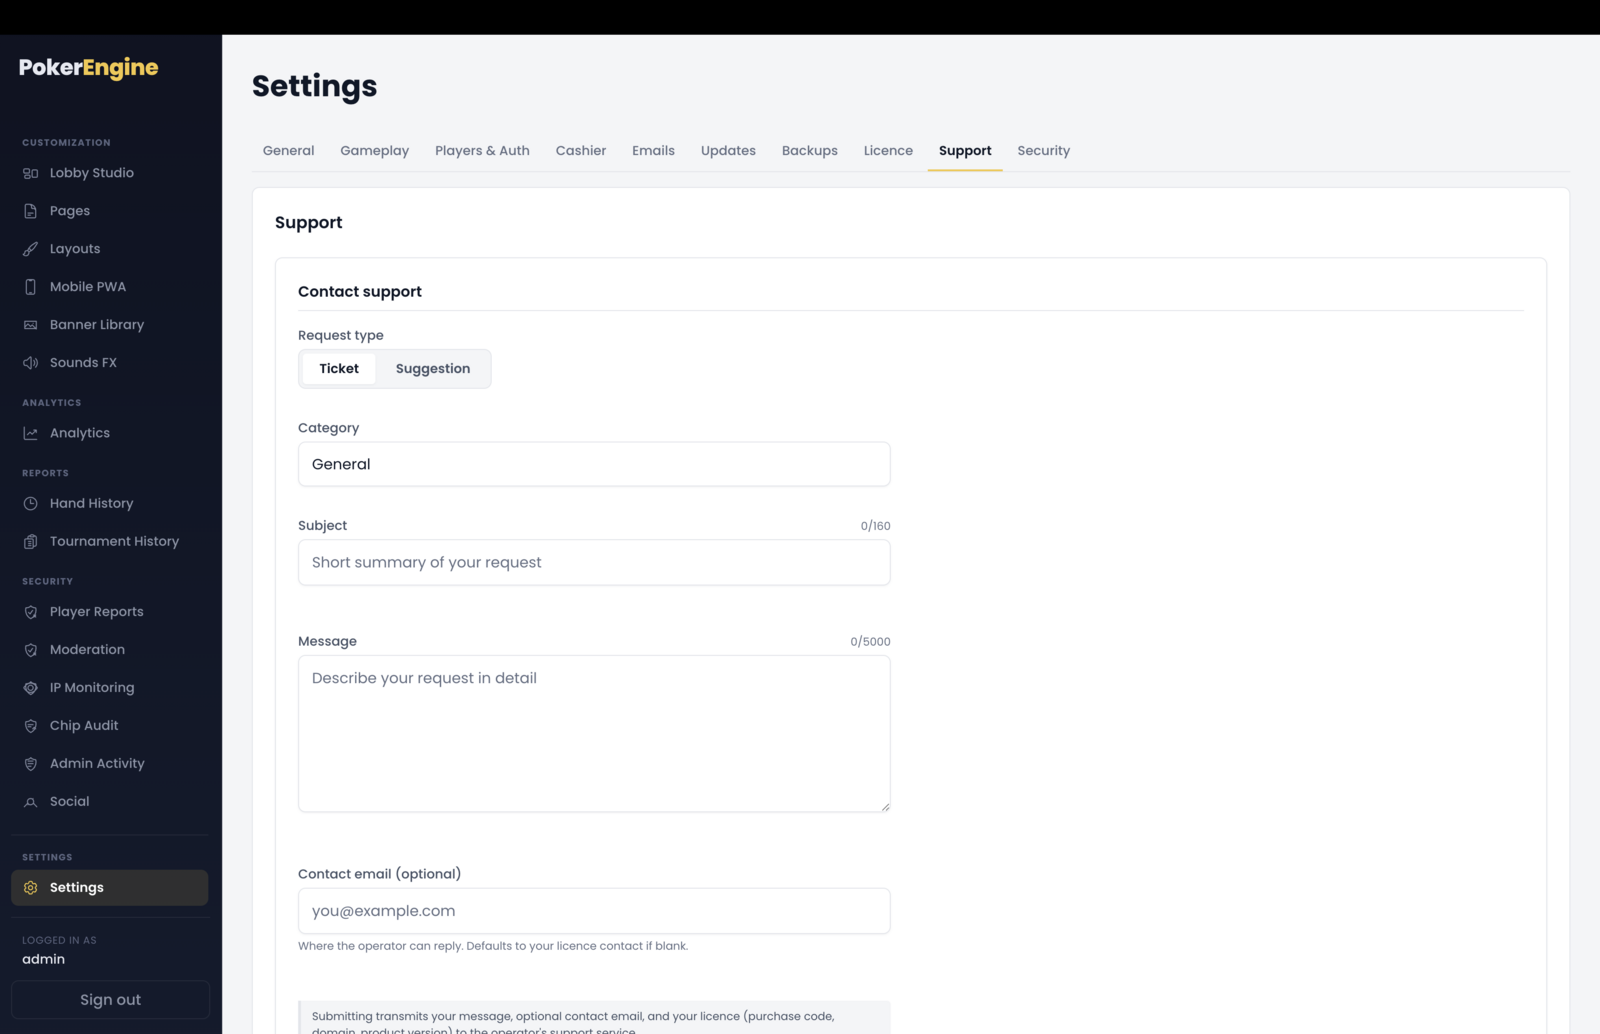
The Support tab is your direct line to our support team, right inside your admin. You can open
tickets, ask questions, send suggestions, and see our replies — a two-way conversation without leaving the
platform.
Support — open tickets and suggestions and see our replies, right inside the admin (licence activation required).
Getting help
Open a request — choose Ticket (a question or issue) or Suggestion, pick a category, add a subject and message, and optionally a contact email for replies. Click Send request.
My tickets — your open and past requests are listed here. Click one to see the full conversation, reply, and close or reopen it.
Automatic updates — the tab refreshes on its own, so when we reply, your ticket updates and shows a “new reply” marker.
Activate your licence first
To keep support genuine, contacting us requires your licence to be activated (the Licence tab).
Your purchase code is how we confirm you’re a real customer — no separate password or key needed. If your licence
isn’t activated yet, the tab will point you to the Licence tab to do that first.
Privacy
When you send a request, it transmits your message, your optional contact email,
and your licence details (purchase code, domain, and product version) so we can identify your
purchase and help you. No player data is ever sent.
Good to know
It works for every buyer, out of the box — activate your licence and you can reach us directly from the admin.
Standard CodeCanyon support (the item’s comments/support on the marketplace) is always available too.
Ready to use. Nothing to configure on your side — just activate your licence and start a conversation.
Security
The Security tab is a read-only reference for the privacy- and logging-related
options that are set at the environment level (your server’s .env), rather than in the
admin. Because these affect data retention and how the platform sees visitor IP addresses, they live in the
environment for safety — the tab simply shows their current values so you can confirm them at a
glance. Any change is made in your .env and takes effect after a quick server restart.
Security — a read-only view of the environment-level logging & privacy values (set in .env, restart to change).
Logging & privacy
IP address logging (IP_LOGS_ENABLED) — whether player IP addresses are recorded (this feeds the IP Monitoring section). On by default. Set it to false in your environment to switch IP capture off entirely.
IP log retention (IP_LOGS_RETENTION_DAYS) — how many days IP logs are kept before they’re automatically purged (default 90). This helps you meet your own privacy/GDPR retention policy — lower or raise it to match.
Trusted proxy (TRUST_PROXY) — tells PokerEngine how many reverse proxies sit in front of it, so it reads the real visitor IP instead of the proxy’s. It shows “No proxy trust” when unset, and “1 hop — typical reverse proxy” when set to 1. If you run behind a reverse proxy (Nginx, etc.), set this to 1 so IP logging, IP Monitoring and rate-limiting all see the true client address.
Changing these
Edit the value in your server’s .env, then restart the Node process — for example docker
compose restart (Docker), pm2 restart (PM2), or systemctl restart (systemd). The tab
reflects the new values once the server is back up.
Good to know
Read-only by design. These are environment values, so they can’t be changed by accident from the admin — the tab is your at-a-glance confirmation of what’s set.
Set Trusted proxy if you’re behind a reverse proxy. Otherwise IP logging, IP Monitoring and rate limits may record your proxy’s address instead of the visitor’s. Most single-proxy setups use 1.
Retention keeps you tidy and compliant. Old IP logs are purged automatically once they pass the retention window, so the data doesn’t pile up.
Ready to use. Sensible defaults ship out of the box (IP logging on, 90-day retention, no proxy trust) — you only touch these if your hosting setup or privacy policy calls for it.